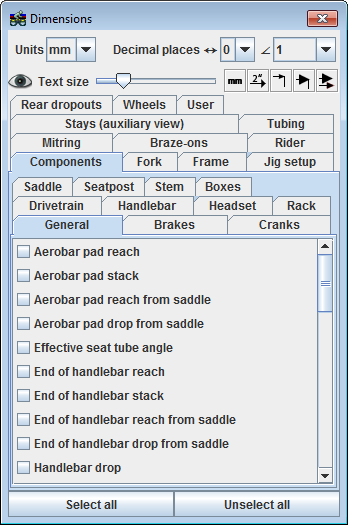
The Dimensions dialog box can be opened by selecting View >> Dimensions or by clicking on the dimensions icon ![]() in the top toolbar. The Dimensions dialog box controls the display of dimensions on the screen.
in the top toolbar. The Dimensions dialog box controls the display of dimensions on the screen.

In the Dimensions dialog box, you'll find dimensions divided into categories. Under Components, you'll find tabs containing dimensions specific to various components. Under Components >> General, you'll find several dimensions which are for the most part distances between different components. For example, we have several dimensions defining the position of the saddle and the distance between the saddle and handlebars.
In the Frame tab, you'll find the bulk of dimensions presented in manufacturers frame specification charts such as head angle and seat angle, seat tube length, effective top tube length, etc.
As dimensions are turned on in your drawing, you can move them around on the screen by grabbing the numeric value of the dimension and dragging it around while holding down the left mouse button.
Note that as you move angular dimensions around, it is possible to show the supplementary angle by dragging the dimension as shown.
The Mitring tab is where you'll find all the mitre to mitre lengths and mitre angles essential for building the frame.
In any given section you can turn on all of the dimensions using the Select all button or turn them all off using the Unselect all button.
If you need to create a lot of dimensioned drawings in BikeCAD, you'll definitely want to set up a number of dimension templates. For example, you could make one template that shows all the dimensions you might like to share with a customer and a second template with dimensions critical to mitring the tubes. For more info, see the page titled Templates in BikeCAD Pro.
Other things to note in the Dimensions dialog box is that you can select between millimetres and inches for linear dimensions. You can also choose the number of decimal places to show for both linear and angular dimensions. Note that angular dimensions can also be shown in degrees and minutes or in degrees, minutes and seconds.
To quickly turn off the display of all dimensions, you can toggle the eyeball icon ![]() .
.
The text size can be controlled with the text size slider.
If you wish to remove the inch or millimetre symbol from linear dimensions you can do so with the no unit toggle button.
You can toggle between numeric dimensions and symbolic dimensions using the symbolic dimension toggle button. For example, instead of showing a chain stay length dimension of 405mm, we could simply show the label chain stay length.
If you'd like to attach a dot to the end of your dimension extension line, you can toggle dots on or off using the dots toggle button.
Instead of an arrow at the end of dimension lines, you could alternatively show a dot. You can toggle between these two options using the dot and arrow toggle botton.
Finally, you can control the size of dimension arrows and dots using the arrow and dot size icon.

